23 October 2009

Day 70 - plastic wrapped again

We finished putting in the floor joists into the main section of the house, leaving only the area around the octagon and a lot of the blocking to be done later.


We then put up two temporary frames along the length of the houses and stretched a large sheet of polytunnel plastic over the top of the houses.

This is a fair amount of work and a considerable expense, but it will help to keep the structure dry and more importantly the insulated ground floor slab. The plastic will stay for the few weeks that it will take to build the remainder of the wall frames, and then we will take it off during a spell of dry(ish) weather, put up the next set of frames and if necessary put it up again.

Once the houses were covered, we pulled up the plastic that had been covering the ground floor slab for the past week to find that over 80% of the surface had got wet. We don't think that much or any of the water soaked into the insulation below, though it would have if we hadn't done anything.
The black builders plastic that we pulled from the floor was reused to cover the walls that the clear plastic sheet didn't reach.

It doesn't look great, but the wooden structure and floor will dry out and remain dry for the next few weeks allowing us to continue to work on the blocking and framing out of the wind and rain.
Neither of us like using so much plastic, but at least with the polytunnel plastic, it will be reused for many years in the gardens and allotments!

22 October 2009

Day 69 - more floor joists

We continued with the floor joists today in good weather, though the floor remained wet. We were able to finish a lot of the non standard areas of the joists including around the stairs, and the projecting pieces at Morag and Bruce's end of the build.

Top of Pat and Wendy's stairs.
Completed joists and header at the north end of the houses. showing the cantilevered area to the right which will support a projecting window/desk.

Opening for the straight stair in Bruce and Morag's house, as seen from the back door.

21 October 2009

Day 68 - starting the first floor

In order to help us build the first floor structure, we first used some of the timber to construct a temporary platform a bit more than half way up the ground floor walls.

These type of things take time, but when we finally started to put in the joists, this elevated platform made it much easier and safer to work.

The main part of the floor structure consist of full length joists that run from the long perimeter walls and cantilever over the interior structural walls and beams that run over the cellar walls. The joists from the front and the joists from the back will be spliced together to distribute the loading and tie the building together. Full height blocking was used over these central walls, and additional blocking will be put in later when we are not so rushed.

Even though we started late on this miserable day, we were able to get a substantial portion of the back joists in place, and took advantage of Eoin (from Wales) helping out for the day to get all of the full length joists up onto the structure.

20 October 2009

Day 67 - finishing the ground floor structure

We had a fair amount of rain overnight, and we have found that our strategy for keeping water off of the wood floor slab is not working. We lifted the plastic in a few places and found some water sitting on the surface of the OSB board. At the moment it does not seem to be doing any damage, but it will eventually leak down into the hemp/lime insulation. We can't wait until the rest of the frames are up and the roof on before doing something, so we have decided to finish putting in the first floor joists and structure and then to cover the entire frame with a big sheet of polytunnel plastic.
We spent the day finishing putting the top plate into position and preparing for the joists.

19 October 2009

Day 66 - cross bracing and beams

It was a cold, windy and rainy day but we spent the day making sure that the walls were plumb, putting in cross bracing to keep them that way and finishing putting the top plate into position.

We were also able to put the 4 beams into position. These two beams over the main space of Bruce and Morag's house are composed of 3 lengths of 225x44mm (9"x2") which will be drilled and bolted together. A similar beam runs over the back of Pat's workshop. these three beams continue the load bearing over the long cellar walls.

A longer beam was put in place over the Octagonal space in Pat and Wendy's house. Because the span is so big in this area, this beam is composed of 4 lengths of 225x44mm timber which will be bolted together. this was a heavy beam but the two of us (with the support of Aaron) were able to lift it into position by constructing ladder of supports up each of the posts for the beam to rest on.

This beam will also be braced at each end to further reduce the span to the 4m that our engineer recommended, so we left a notch out of the bottom of the beam so that the brace could be inserted later. Pat has a few lengths of ash poles which will be used as bracing 'in the round'.

18 October 2009

Day 65 - finishing the framing and covering

We didn't spend a lot of time on site today, but while Pat continued to cover the gaps in the plastic sheeting on the floor, Bruce, Eoin, Morag and Leontien worked to continue to nail the framing together and to the floor slab and adding cross bracing to the external walls. We also cut out the pieces for the beams and started to assemble them.

The first sections of the top plate were nailed in place to tie all of the wall sections together and to strengthen the structure.

17 October 2009

Day 64 - part 3 - covering up

While a few of us continued to work on securing the framing that had been temporarily nailed together, Pat and the rest of the crew that continued to help out set to work laying heavy builders' plastic on the floor in anticipation of rain. Having pulled up the one large sheet of plastic earlier in the day, we needed to make sure that the wooden floor slab did not get too wet. The solution we came up with was to create shallow pans or tanks in each of the spaces of the houses, from which the excess water would drain away through the door openings. Though not an ideal or perfect solution it is the best option we have, as it will allow us to continue to work, while protecting the floor.

Once again we have been blessed with he weather! About an hour after the main sections of the floor were covered with plastic it rained!

Day 64 - part 2 - ground floor frame complete

It took us 4.5 house to put up all of the external and load bearing internal frames for the ground floor! That includes a break for lunch! 34 frames in total went together, some of them very large and heavy and a few of them quite small and light. There were a few small errors of measurement and placement, but only things that Bruce would fuss over.

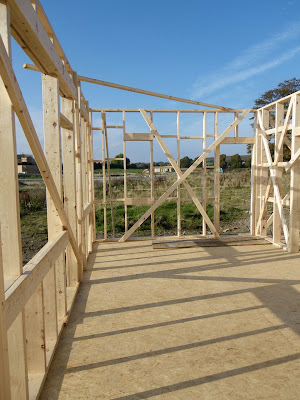
Overall view of the completed framing with temporary external bracing still in place. The panels are 2.88m high (almost 10 feet), and with the thickness of the ground floor slab and the space underneath, the framing is quite high.

View of the octagon with Pat and Wendy's front door to the left.

The front of Bruce and Morag's house with kitchen window to the left, front door in the middle, and large window to the dining room to the right.

View across the front of Bruce and Morag's house towards the side wall of the kitchen. the framing is only the outside of structure of the wall. An another wall will be constructed inside the space, to create a cavity 40cm thick which will be filled with hemp/lime insulation. this will reduce the size of the rooms by 25cm at the external walls, but will also provide deep window openings.

The double thick party wall with two lines of studs and substantial cross bracing between them.

View across the front rooms of Pat and Wendy's house, looking towards the octagonal shaped sitting area (session space!) from the kitchen, with the front door to the right.

The long back wall of the two houses.

Overall view from the North-West showing Bruce and Morag's house in the foreground.

Day 64 - part 1 - Barn Raising!

The day of the frame raising finally arrived. And again we have been blessed with the weather. We have arranged for a team of about 8-10 people to help us put all of the ground floor wall panels in place. Bruce, with the help of Eoin, will be responsible for laying out the positions of the panels and for tacking them into position, while Pat will head of the larger team to move the frames into position.

We started the day by raising the plastic in the corner in order to move the plywood that was covering the hole into the cellar (the sheet would have been in the way of some of the walls). We have planned that the walls would simply be placed on top of the plastic, leaving it undisturbed.

But we found to our dismay that the the two sheets had leaked in a few places! So the plastic was pulled up, and although we will have to come up with another way to protect the floor after the frames were in place, it does make the whole day easier as we will not have to worry about damaging the plastic.

Only one section of the floor was wet, and it didn't seem to have soaked into the hemp/lime insulation below. The OSB board that we used is quite resistant to water, and the coat of varnish would have helped.

In the background of the photo above is one of the two stacks of wall frames. We built a second brace at the end of the pile so that the frames could be flipped to one side or another so that we could easily pull out the frame we needed to put in place next.

The first frame being moved from the pile. It took a while to figure out how best to move these large frames.

Everyone had the required high vis vests and safety helmets, though Pat was left with a non-standard riding helmet. Safety first!

The first frame being raised into position on the floor slab.

Bruce was about to hammer in the first nail (with a posed smile)!

The second frame goes in to form the first corner (which happens to be Bruce and Morag's kitchen) while Eoin measures out the line of the third frame. The frames were assembled in such a way that they supported each other as much as possible while the rest of them were assembled.

Bruce rushes into position, drawing his trusty hammer!

Everyone concentrates on the third frame.

The end of the house begins to take shape, as the fantastic weather dries out the floor at the other end of the house.

The heavy frames are moved with ease across the site when there are enough people. (John Burke's house in the background).

The first of the three sections of the party wall between the houses gets lifted into position. This was the largest and heaviest panel, as it was made of two frames nailed together.

A little persuasion to put the frame in place. "Sledge to the millimeter" was the motto of the day!

The main front wall of the house finished in time for lunch/tea break (as well as the camera battery wearing out from all of the photos that Morag took!)

The rest of the frames went in very smoothly with everyone knowing what to do. There were a few pieces of cross bracing that needed to be sawed off, but everything else went in very quickly, perhaps too quickly as Bruce and Eoin had to race to keep ahead of Pat and his crew, with the result that there were a few errors of measurement, but nothing that would cause problems, or would be noticed in the future.

16 October 2009

Day 63 - preparing for the frame raising

This morning we built a few small frames to finish all of the exterior and interior load bearing walls for the ground floor. We then spent the rest of the day preparing for the frame raising tomorrow.

We even had enough time to produce a cut list of joists, blocking and headers for the first floor structure and to cut most of them in the workshop, so that they would be ready in case we had enough time and people to get them into position after the frames go up.


Most of the joists are standard lengths (with many of them being full 4.8m lengths), but there are a number of unusual lengths, which were marked to help with identification.

15 October 2009

Day 62 - finished the interior frames

We finished the interior wall panels today, and looking set for the big frame raising on Saturday once we get a few small exterior frames built tomorrow.

The interior frames are different from the exterior frames, as the cross bracing needs to be flush with the studs. We though notching each stud would be difficult to do, but it ended up being quite straight forward with the use of a skill saw set to the right depth, a hammer to knock out the wood, and a chisel to clean up the base of the notch.

There were a few other unusual cases of cross bracing, such as the one in the photo above to strengthen the area over two interior doors.

In some of the panels that will be placed over the cellar walls, we turned the 100x44 blocking so that it was flat positioned it so that it was in the centre of the stud (bottom centre of photo above). This will allow us to add cob (clay, sand and straw) into the space between the stud as thermal mass, into which we will embed the wall heating coils connected to the district heating system.

14 October 2009

Day 61 - interior load bearing walls

We had to build a second stack for the frames, this time at the back of the site (on the left in the photo below), to hold all of the interior frames, and the ones for the back wall.

Today we worked on the interior load bearing walls, which are made out of 150x44mm (6"x2") - but didn't take any photos of our progress.

13 October 2009

Day 60 - the long back wall

Today we worked finished the panels that compose the long back wall of the two houses. As this wall faces North-East, and away from the views, it is composed of much smaller windows, most of which will slot in between the studs - which are spaced at 600mm centers (2 foot centers) - as seen above

Because the studs run uninterrupted beside the window, there is no need for a standard lintel. Instead we added two horizontal pieces to the back face of the frame to strengthen the top and bottom of the window and provide support for the sill and frame. We plan to make our own opening windows which will be fixed directly to the stud frame.

12 October 2009

Day 59 - double party wall

Today we finished the three sections of the party wall dividing the two houses. In fact these are 6 panels, combined in pairs by the internal cross bracing. The double wall - made out of 100x44mm framing rather than 150x44mm framing used on the exterior walls - will help with reducing sound transmission and increases the fire rating of the wall.

We decided against using a nail gun and have opted for the slower but stronger approach of hammer and nails.

10 October 2009

Day 58 - more ground floor frames

For the last few days we have been covering the stack of wall panels with plastic, to keep them dry. The timber can deal with a certain amount of water, but we thought we would keep them as dry as possible. We also needed to tie the stack together so that none of the panels moved or fell as they are heavy and would cause considerable damage if any of them fell.


This of course requires one of us to climb up onto the stack ...

We completed the panels for the south end of Pat and Wendy's house this morning. In the photo above we are lifting the section with the big double doors that lead into the kid's room.