It took us 4.5 house to put up all of the external and load bearing internal frames for the ground floor! That includes a break for lunch! 34 frames in total went together, some of them very large and heavy and a few of them quite small and light. There were a few small errors of measurement and placement, but only things that Bruce would fuss over.

Overall view of the completed framing with temporary external bracing still in place. The panels are 2.88m high (almost 10 feet), and with the thickness of the ground floor slab and the space underneath, the framing is quite high.

View of the octagon with Pat and Wendy's front door to the left.

The front of Bruce and Morag's house with kitchen window to the left, front door in the middle, and large window to the dining room to the right.
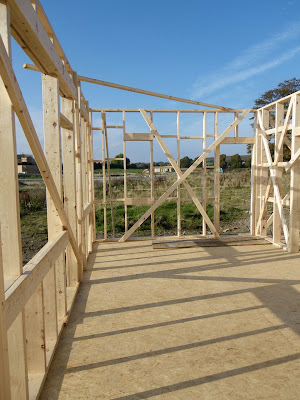
View across the front of Bruce and Morag's house towards the side wall of the kitchen. the framing is only the outside of structure of the wall. An another wall will be constructed inside the space, to create a cavity 40cm thick which will be filled with hemp/lime insulation. this will reduce the size of the rooms by 25cm at the external walls, but will also provide deep window openings.

The double thick party wall with two lines of studs and substantial cross bracing between them.

View across the front rooms of Pat and Wendy's house, looking towards the octagonal shaped sitting area (session space!) from the kitchen, with the front door to the right.

The long back wall of the two houses.

Overall view from the North-West showing Bruce and Morag's house in the foreground.
 Overall view of the completed framing with temporary external bracing still in place. The panels are 2.88m high (almost 10 feet), and with the thickness of the ground floor slab and the space underneath, the framing is quite high.
 View of the octagon with Pat and Wendy's front door to the left.
 The front of Bruce and Morag's house with kitchen window to the left, front door in the middle, and large window to the dining room to the right.
 View across the front of Bruce and Morag's house towards the side wall of the kitchen. the framing is only the outside of structure of the wall. An another wall will be constructed inside the space, to create a cavity 40cm thick which will be filled with hemp/lime insulation. this will reduce the size of the rooms by 25cm at the external walls, but will also provide deep window openings.
 The double thick party wall with two lines of studs and substantial cross bracing between them.
 View across the front rooms of Pat and Wendy's house, looking towards the octagonal shaped sitting area (session space!) from the kitchen, with the front door to the right.
 The long back wall of the two houses.
 Overall view from the North-West showing Bruce and Morag's house in the foreground.


